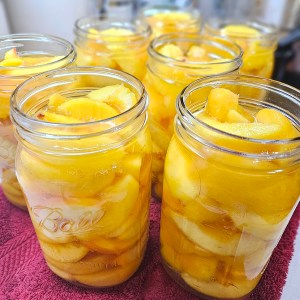
Canning Fresh Peaches
Water bath canning is a great way to preserve fresh peaches so you can enjoy the flavors and benefits of homegrown fruit all year long!
Print
Pin
Save
Ingredients
- 17 pounds ripe peaches
- 2 cups sugar
- 6 cups water
- 1 bag ice
Optional To Prevent Browning
- 3 tbsp fruit preserver (or ½ cup lemon juice)
- 2 quarts water
Instructions
- First, get your water bath canner ready and warm up the jars. I do this by filling each jar with warm water and placing them into the water bath canner. Then fill the canner with hot water until it reaches the top of the jars. Turn your canner or the stove on and start heating up the water and jars. Canning Tip: Add a splash of vinegar to your water bath canner water. This will help to prevent hard water spots from forming on the jars.
- Wash all your peaches and gently scrub off the peach fuzz. Next, remove the peel. To do this, cut a shallow “X” into the base. Working in batches, drop each one into boiling water for 45 to 60 seconds. Remove the peach and immediately place it into ice water. Once cool, the peels should easily slide off.
- Once the peaches are peeled, cut the peaches in half, quarters, or slices, removing the pit. Place the cut peaches into a large bowl treated with Fresh Fruit Preserver or lemon juice to prevent the peaches from browning. If using Mrs. Wages Fresh Fruit Preserver, add 3 Tbsp of the preservative to 2 quarts of water. If using lemon juice, add 1/2 cup of lemon juice per 2 quarts of water. Leave the peaches in this solution until you are ready to add them to your canning jars.
- Now, create a simple syrup using a mixture of water and sugar. This is the liquid that gets added to the jars with the peaches. See notes below for the "Ball Blue Book Guide To Preserving" ratio. (I use a ratio of 2 cups of sugar to 6 cups of water.) Place the water and sugar in a large pot and bring the mixture to a boil. Stir until the sugar is completely dissolved. Keep the syrup simmering.
- Next, pour the water that's in the hot canning jars back into the water bath canner and place the empty jars on a folded kitchen towel. Fill the hot jars with peaches. Gently tap the jars to get the peaches to settle to the bottom. Add the hot syrup, leaving ½ inch of headspace. Use a plastic knife, a bubble popper, or something similar to remove any trapped bubbles. Top the jar off with additional syrup if needed, still leaving ½ inch headspace. Once the jars are filled, use a clean, damp paper towel to clean off the rims. Add a new canning lid (i.e., a flat) and a band to each jar, tightening it to finger tight. Place the jars back into the canner using a jar lifter. Repeat until all of the jars are filled. Make sure there is at least an inch of water above the top of the jars. Add the lid to your canner.
- Process pint jars for 25 minutes and quarts for 30 minutes. Do not start the timer until the water bath canner has been brought to a full rolling boil. Once the time is up, turn off the heat and remove the lid. Allow the jars to sit in the canner for 5 minutes. Then, using a jar lifter, lift the jars out one by one and place them onto a folded towel. Once you set the jars down, leave them undisturbed for 24 hours. After the 24 hours are up, remove the bands and check each lid to make sure they have properly sealed. Place any jars that don't seal into your refrigerator and consume within a week. The sealed jars are now shelf-stable. Store the jars without the bands in a cool, dry location.
