
Instead of tossing your homegrown garlic that has already sprouted or is just showing signs of sprouting, store it for long-term use by freezing it! Putting in a little work now will allow you to have delicious minced garlic that you can use in any recipe that calls for it!
No matter how big and beautiful your stored garlic bulbs look, at some point, they are going to start sprouting. This is the process of the individual cloves starting to produce new garlic plants.

Sometimes it happens when the garlic is exposed to too much light, moisture, or heat. Other times, it’s just the age of the bulbs. Typically, garlic naturally starts to sprout during the late winter months.
If you start to see those little yellow or green sprouts when you cut into a clove of garlic, there is no need to panic. The best thing you can do is to batch preserve the garlic so you can keep using it in the kitchen.
While you can purchase jars of canned minced garlic in grocery stores, it’s not advisable to can it yourself. Instead, you can freeze the garlic for long-term storage. Freezing sprouted or unsprouted minced garlic allows you to have easy access to almost-fresh garlic whenever a recipe calls for it – all without needing to toss your hard-earned harvests in the compost!
Garlic Bulbs Storage Life
After harvesting your garlic in the spring, you need to allow it to cure so you can store it long-term. Curing is the process of allowing it to fully dry out naturally for a few weeks. Then you can prepare it for storage. (You can read more about that in my article here, “How To Harvest And Cure Garlic For Long-Term Storage”.
Once cured, sort through the bulbs and keep the biggest, healthiest ones for replanting in the fall. Store the rest in a breathable bag or mesh fabric in a dark, cool location. We keep ours in the back of our pantry in the basement in brown paper bags.

While I’ve grown both hardneck and softneck garlic in the past, I prefer the taste and growth habits of hardneck garlic. (I also love the addition of the garlic scapes that hardneck garlic produces!) It also does a little bit better with the cold Illinois winters we usually have.
Softneck garlic tends to store and last a bit longer than hardneck garlic. Softneck garlic typically keeps for around 8 months, while hardneck only tends to last around 4 months.
This means that the hardneck garlic I harvest in October should be frozen before sprouting sometime during February (about 4 months). If you don’t hit that timeframe, then don’t be surprised to start to see green or yellow growth in the center of a cut-up clove – that’s the sprouts. No worries if you do, though. You can still easily freeze and store the sprouted garlic!
Freezing Sprouted Garlic Tips & Tricks
The first step in freezing your stored garlic is to prepare it for mincing.
Side Note: I personally love the smell of garlic. However, if you are someone who doesn’t, you want to keep in mind that the odor in your kitchen will be rather strong during this process! Consider doing it in a heated garage or somewhere else. (Also, we can’t be friends if you don’t like the smell! Just kidding, but it is one of my top favorite scents!)
Anyway, step one is to separate the garlic bulbs into individual cloves. Remove any that look like they have started to mold or that have shriveled. Those cloves should be tossed in your trash or compost.

Next, it’s time to peel the garlic. I always thinly slice off the root end of the clove first. (It is the flat side that looks dried out.) Taking the time to do this step makes peeling the individual cloves easier. If you have some other preferred method of peeling garlic, by all means, go that route!
Once the root end is off, I can usually remove the papery outer skin pretty easily. Some people keep the peel to dehydrate and use as a mild garlic powder, but I usually just add it to my compost bin.
Your fingers might start to get a bit sticky during this process. Also, if you have any cuts on your fingers, they might start to burn depending on how hot your garlic is! This is something I learned the hard way recently! Wear gloves if that is the case.
Removing The Sprout
After all of the papery peel has been removed, the next part of the freezing sprouted garlic process is to remove the sprouts. This step is totally optional, but one that we always take. Obviously, if you are using unsprouted garlic, you can skip this step completely.
Sprouted garlic is still safe to eat as long as it isn’t moldy. Some people leave the garlic as-is and just chop it all up like they would any garlic clove.
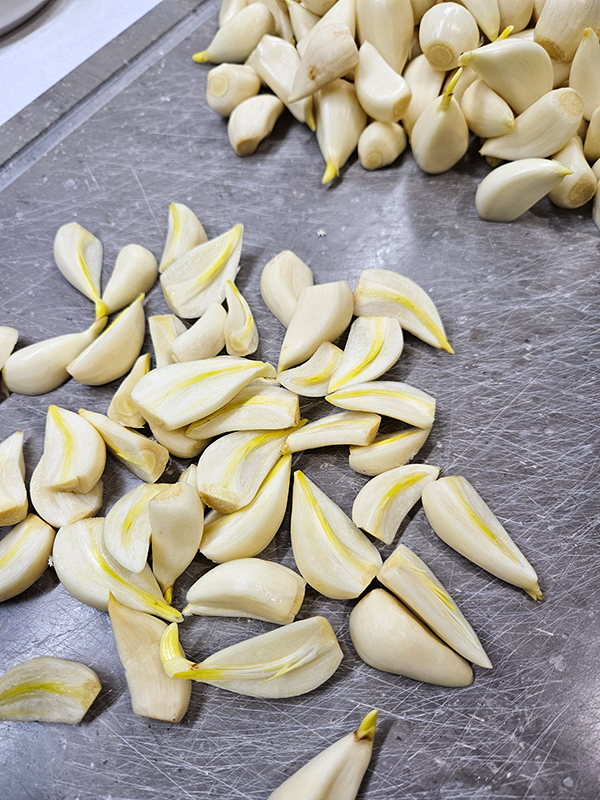
However, I prefer to remove the yellow sprouts from the cloves before freezing. It can have a bit pungent flavor, especially if you are using the garlic raw. Some people think the sprouts can even taste bitter. So really, that part of the freezing process is your own personal choice.
Another Side Note: Our stored garlic was a bit past its prime when I took the photos for this article. We’re talking more around 5 to 6 months as opposed to the recommended 4 months. So quite a few of the cloves have started to sprout and produce those little yellow shoots even past the tip of the clove.
Ideally, I should’ve been freezing my garlic about a month or so before that happened. But you know, life happens and the chore got away from me. That’s part of real-life gardening and semi homesteading! The garlic is still totally fine to freeze and use.
Mincing The Garlic – Freezing Sprouted Garlic
Once all of the sprouts are removed, it’s time for mincing. You can definitely do this process by hand or by using a garlic press. But I have a quicker, less labor-intensive method: Use a food processor!

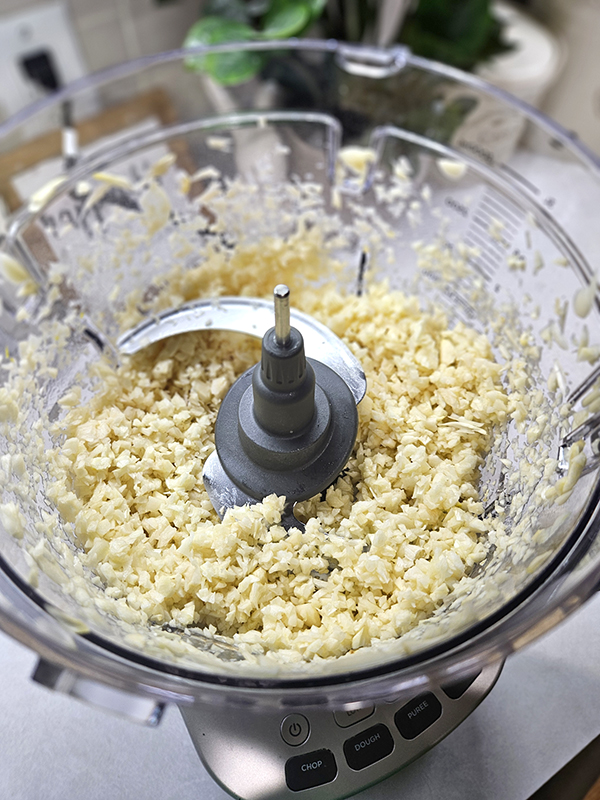
Place as much garlic into the food processor as it can handle in one batch. I have a large capacity, heavy-duty food processor, so I can usually get all of my garlic minced in one go. It definitely comes in handy whether I am pureeing peanuts to make homemade peanut butter or chopping up vegetables quickly. (Product Link: Ninja Food Processor, Professional XL)
Pulse the food processor only until your garlic reaches a minced consistency. If you want more of a paste-like consistency, go ahead and set the food processor on low until the desired thickness is reached.
Storing The Sprouted Garlic Long-Term
Next, it’s time to freeze the garlic and put it into freezer-safe containers for long-term storage.
Silicone ice cube trays are great for freezing minced garlic into individual chunks or “cubes”. You can find them in a whole bunch of different sizes and shapes. I found my silicone trays at Walmart, and they hold about one tablespoon of minced garlic in each section. (Here is the same brand, just in red: Silicone Ice Tray Set.)
If using silicone molds, firmly press the minced garlic into each section. Really pack it in there so it will hold together once frozen. There is no need to add oil or water. The garlic has enough liquid to keep the “cube” together.


Cover the silicone container or put the molds into a large ziplock bag. Place it in your freezer overnight. Once frozen, simply pop out each garlic “cube” and store them in a freezer-safe container or ziplock bag, removing as much air as possible. Be sure to label the container.
Alternatively, you can place the garlic in a freezer-safe ziplock bag. Remove all the air and then flatten the garlic out evenly. Use your finger or the end of a spoon to divide the garlic into sections from the outside of the bag. This is optional, but it will allow you to break apart sections of the garlic more evenly. Label and freeze flat.
Use the frozen garlic in any recipe that calls for minced garlic. You don’t have to thaw it out if cooking, but I would for using it raw. Hopefully, this allows you to extend your garlic harvest, whether they have sprouted yet or not, until your next batch is ready for storing and using!
Until next time, thanks for stopping by!
– Chelsea
*This post may contain affiliate links. These are products I have used personally and highly recommend. As an Amazon Associate, I may earn a small commission from qualifying purchases if you purchase items through my links. These links and the ads on this page help to support my family and our semi homestead, so Thank You!

Freezing Sprouted or Unsprouted Garlic
Ingredients
- Any amount of garlic cloves (sprouted or not)
Instructions
- First, separate the garlic cloves from the bulb. Remove any dried or rotten cloves and discard.
- Peel the cloves. To do this, thinly slice off the root end of each clove. The papery skin can then be easily removed.
- Optional: Slice each clove in half to access the yellow sprout. Remove this from each side. (The sprouts can be bitter and have a bad flavor, so we remove them before freezing.)
- Place the cloves in a food processor. Quickly pulse until the garlic is minced. For pasted garlic, process on low until desired consistency is reached. If you don't have a food processor, you can mince the garlic by hand using a chef's knife.
- Once minced, firmly press the minced garlic into silicone molds. Place the filled mold in a ziplock bag and freeze overnight. In the morning, remove the frozen garlic "cubes" from the molds and place them in a freezer-safe container or ziplock bag. Label, remove the air, and freeze. Alternatively, place the garlic in a labeled freezer-safe ziplock bag. Remove all the air and seal. Flatten the garlic out evenly. Use your finger or the end of a spoon to divide the garlic into sections through the bag. This can make proportioning the garlic once frozen easier. Lay flat and freeze.
- Use the frozen garlic in any recipe that calls for minced garlic. If using raw, thaw first. For cooking, there is no need to thaw unless desired.
Discover more from Semi Homestead Life
Subscribe to get the latest posts sent to your email.