
There is nothing like the feeling of harvesting and preserving your own sweet corn. From planting the seeds to watching it grow until it’s finally ready for picking and harvesting, the entire process is so rewarding! It’s something I’ve grown up doing, and I want to share the process with you!
If you’ve never had freshly picked sweet corn, you are definitely missing out! Sure you can purchase corn at the supermarket, but it just doesn’t have the same flavor as corn that goes directly from the field to your kitchen table within the same day.
This time of year, you can usually find sweet corn at local farmer’s markets, little front yard stands, or even (if you are lucky), from your next-door neighbor! We are lucky enough to get sweet corn from my parents’ farm.

While they don’t plant a ton of sweet corn, we still make it a yearly tradition to gather at their house for harvesting and preserving it once it’s ready. It’s something I look forward to each and every summer!
If you are able to get an abundance of sweet corn this summer, instead of making yourself ill by eating it for every meal, follow these simple steps for preserving it to enjoy all year long! You’ll thank me when you are able to walk to your freezer to thaw out a bag and it tastes just like summer!
Our Process For Harvesting & Preserving Sweet Corn
*You can scroll down to the bottom of this post to see the actual shortened steps on preserving sweet corn. You can also print out the instructions as well. I just like to go into a bit more detail about the whole process here first though, just in case you want to hear the whole story!
While you can use supermarket sweet corn for this, I highly suggest using freshly picked local corn if at all possible. The flavor just can’t be matched! However, the process of preserving will work no matter how you get an abundance of sweet corn.
Planting The Corn
Step one is to get the corn seeds into the ground! Around mid to early May, my dad (otherwise known as “Grandpa” to my kids) gets out his 6-row planter and plants a patch of sweet corn. Usually, he has an empty spot already reserved right next to some of his field corn.

This year, he had three different varieties of sweet corn: Ambrosia, Bodacious, and Serendipity. (Don’t you just love their names?!) He planted three rows of Ambrosia and three of Bodacious first. Then, a couple of weeks later, he did three rows of Serendipity and another three rows of Ambrosia.
This method of staggering the planting dates is called “succession planting.” By planting this way, you are ensuring that some of the crops will be ready before the others. It helps to space out the harvest so that everything isn’t ready all at once.
Once planted, it’s time to cross your fingers and hope that Mother Nature takes it easy on the growing corn!
Harvesting The Corn
Fast forward to mid-July, and the first planting of sweet corn is ready to be harvested. Thankfully, the coons had not found the planting site this year. For the past couple of years, we weren’t so lucky. It’s amazing how they can immediately tell when it is ready and always seem to get there first!
Since we don’t have a large patch of sweet corn, we harvest it by hand. Depending on the weather, it can be a hot and sweaty job for sure! My kids and I went to help out my parents and make the job go a little bit quicker. It’s a family affair and a fun part of my memories growing up on the farm.

The ears were a bit on the smaller side compared to some years, but there was plenty of corn still on the ears. (Besides, I actually prefer my sweet corn kernels to be on the smaller size!) To know if they were ready for picking, we had to feel for plump kernels through the husks and pick what we thought was ready.
*Side Note
If you ever do purchase sweet corn at the grocery store or a farmer’s market, DO NOT remove the husks until you are ready to cook it or preserve it. The corn will start to dry out without the protection of the husks.
Also, if you don’t plan on cooking it that night, store the corn in your refrigerator. This helps to slow down the conversion of sugars. When it is first picked, sweet corn is high in sugar and low in starches. But the longer it sits, this will swap and your corn won’t be as sweet and tasty.
Shucking – Harvesting & Preserving Sweet Corn
After that, it’s back to Grandma and Grandpa’s house for shucking. We all sat around a small kiddie pool and got to work removing the husks and silks from the ears.
To shuck sweet corn, it is easiest to peel it back in three chunks (think of it like peeling a banana). Press your thumbnail under the top of the husks on one side and peel the first third of the husks back. You should reveal a strip of sweet corn kernels if done properly.
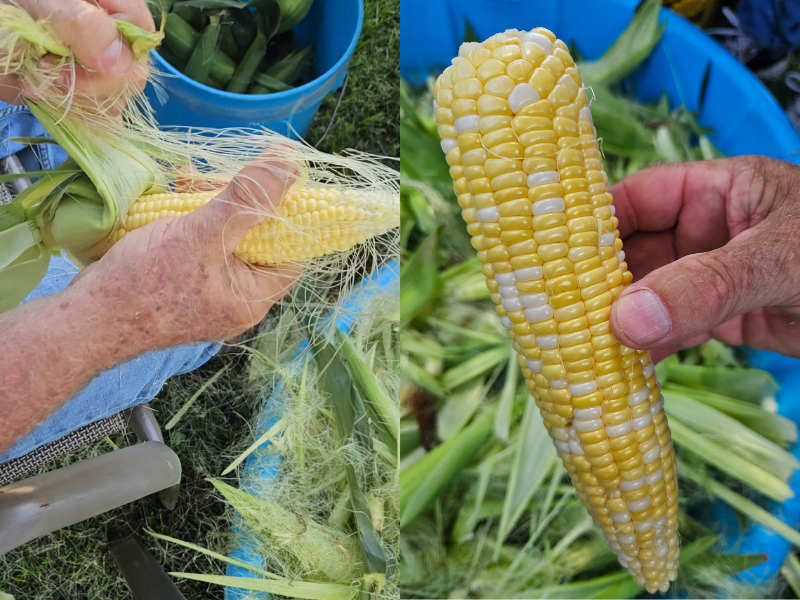
Divide the remaining husks into half and do the same. Once all the husks are peeled back, you can break off the end. (Scroll down to the bottom of this article to see a short video of the entire process, including removing the husks and processing.)
Now is the “fun” task of removing the silks. This can be a pain in the you-know-what depending on the variety of corn and whether it is fully mature or not. This year, the Bodacious variety came off easily while the Ambrosia took a bit more time.
Don’t be alarmed if you see worms in the tip of the corn. These are called Corn Earworms and they like to eat the sweet corn just as much as you do. The best way to handle them is to take a sharp knife and cut below the damaged area. The rest of the corn is completely fine to cook and eat.
Clean & Cook
The next step is to wash each ear of sweet corn one by one. I’m not going to lie, this is my least favorite job out of everything for some reason. The only positive is that the corn makes your hands super soft by the end of the day!
We use a simple handheld brush to help really scrub the corn and remove any remaining silks. If you end up getting the same one we use, just make sure not to pour any boiling water down the drain while it is in the sink (*Cough* Speaking from personal experience!) (Product Link: Corn De-Silking Brush)
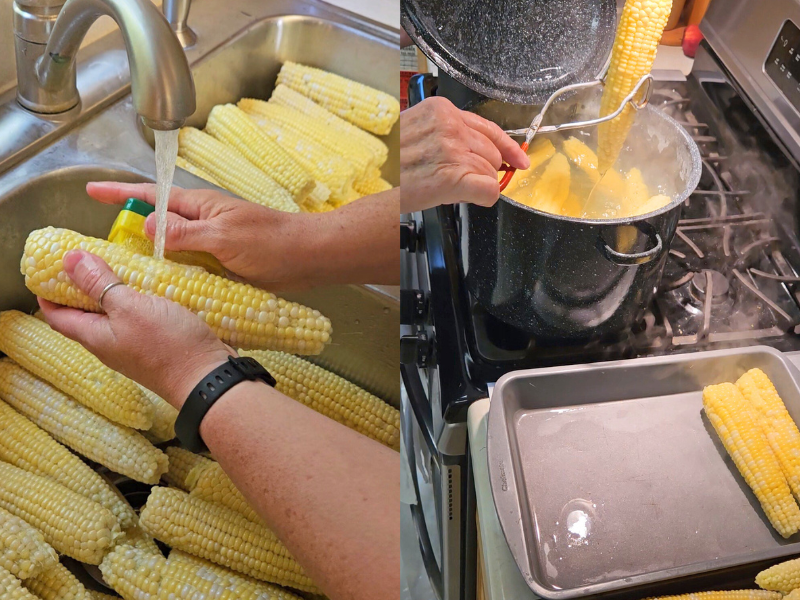
Once it is clean, you need to put the corn into rapidly boiling water for 6 minutes. Now, the cooking will vary depending on who you talk to. Some people say you should only cook for 3 minutes while others go all the way to 8 minutes. We personally find that 6 minutes is the sweet spot for our family. As always, you do you!
We have two very large stock pots going at once for this process and can boil between 10 to 12 ears in each, depending on their size. Set a timer and remove the ears as soon as it goes off.
Allow the water to return to a rolling boil between batches. You will likely need to dump and redo your water in the stockpot occasionally if you have several batches to cook.
Ice Bath & Cutting – Harvesting & Preserving Sweet Corn
You are in the home stretch now! The next step as soon as the timer goes off is to carefully but immediately transfer the ears of corn into an ice bath to stop the cooking process.
We like to use two large coolers filled with ice and water. As the corn is done cooking, the ears from both stock pots go into one of the coolers. The next batch of cooked corn will go into the second cooler.

Usually, by the time the second batch is done cooking, the first cooler of corn will be completely cooled and ready for cutting. If the corn is still warm, add more ice and allow it to cool completely before cutting.
Now, the cooled corn can be cut off of the cob. My Mom and my late Grandma (her mom) always used the American Corn Cutter, so that is also my go-to device. My other late Grandma (Dad’s mom) actually cut the corn off with a knife, which would’ve taken forever! I’ll stick to the cutter. (Product Link: American Corn Cutter)
Preserving Into Freezer Containers
The corn then gets divided into freezer-safe quart-sized ziplock bags. We like to put three cups in each bag, but you can do more or less depending on your family’s preferences. Remove all of the air, seal, and label the bags. Allow them to freeze on a tray or flat surface. For the best flavor and quality, use within 8 to 12 months.
Now you will have delicious and fresh sweet corn that you can enjoy all winter long! I hope you give this process a try the next time you find yourself blessed with an abundance of freshly picked sweet corn!
Until next time, thanks for stopping by!
– Chelsea
*This post may contain affiliate links. These are products I have used personally and highly recommend. As an Amazon Associate, I may earn a small commission from qualifying purchases if you purchase items through my links. These links and the ads on this page help to support my family and our semi homestead, so Thank You!

Preserving & Freezing Sweet Corn
Ingredients
- Sweet corn
- Ice
Instructions
- Gather a large amount of sweet corn that was picked the same day. Remove the husks and silks off each ear of corn. Cut off any damaged areas with a sharp knife.
- Next, fill a large stockpot with water and bring it to a rolling boil. Keep the water boiling until you are ready for using.
- Meanwhile, wash each ear of corn under running water, scrubbing with a brush to help remove any of the remaining silks.
- Once water is boiling, add about 10-12 ears to each stockpot, depending on the size of the pot you are using as well as the size of each ear of corn. Do not overcrowd the pot. Boil for 6 minutes then immediately remove and place in an ice bath.
- Allow the corn to cool completely. Once cool, cut the kernels off with a knife or corn cutter. Add the corn to freezer-safe ziplock bags. Remove all the air, seal, and label with the date and product.
- Transfer to the freezer, laying flat to freeze completely. Consume frozen corn within 8 to 12 months.
Notes
Discover more from Semi Homestead Life
Subscribe to get the latest posts sent to your email.