If you want to enjoy large, delicious garlic bulbs in the summer, then planting your garlic in the fall is a must!
The fall is the perfect time to get garlic in the ground. Not only does it give the plants a head start on growing, but it sets the plants up for success later on as well.
Garlic is available in two different varieties: softneck and hardneck. You can plant softneck garlic in the spring. However, you will be rewarded with larger, more flavorful bulbs by planting them in the fall instead.

Garlic is actually one of the easiest crops to plant and grow. It requires very minimal care and will be one of the first crops to greet you in the early springtime. It’s a welcoming sign after a long, bleak winter!
With a few simple tips and suggestions, I will show you everything you need to know to get your cloves in the ground and on their way to a successful growing season this fall!
Softneck vs Hardneck Garlic
While there are several different varieties of garlic available, they are broken down into either softneck or hardneck. Which type you plant and grow will depend on your growing location and how long you wish to store your garlic.
Softneck garlic requires long growing periods and does better in warmer climates. It features overlapping cloves with thick skins in multiple layers. Once cured and dried, the stems of softneck garlic can be braided for an attractive storage option. The garlic that you see in grocery stores is often softneck garlic because it stores well.
Hardneck garlic has a strong, sometimes spicy flavor depending on the specific variety. It features one layer of easy-to-peel cloves that surrounds a thick central stem (hence the name “hardneck”). It is usually grown in colder climates and is the type I prefer to grow here in Illinois, Zone 5.

Hardneck garlic also produces garlic scapes. These garlic scapes are long flower stems that can be harvested and used in dishes for a mild garlic flavor. (It’s one of my favorite parts of growing garlic!)
Softneck garlic can be stored for up to 8 months after curing. Hardneck garlic, on the other hand, can only be stored for around 4 to 6 months. In addition, hardneck garlic requires a period of cold temperatures in order to form bulbs whereas softneck doesn’t.
Tips For Planting Garlic In The Fall
The first step in planting garlic in the fall is to find your seed stock. You don’t want to just go to your local grocery store and grab a few bulbs off the shelf. While that might get you some success, it’s better to use actual garlic seed stock for growing.
Garlic sold in stores has likely been shipped from far away and most often won’t be suited for your growing location. In addition, garlic sold in stores may also have been sprayed with growth inhibitors or other chemicals. So it’s best to just steer clear.
I purchased my seed stock garlic from an online retailer that is a specific garlic grower. There are several different online retailers as well as seed catalogs to purchase from. You might even be able to find garlic seed stock from your local garden centers, farm stores, and greenhouses.

The best part about growing your own garlic is that you typically only have to purchase it once. After you have it harvested and cured in the summer, you can then use those same cloves to plant again the following fall. So starting off with proper seed stock is important for healthy and successful growth year after year.
Prepare The Planting Site
After you have your garlic seed stock, it’s time to prepare the planting location for fall planting. Aim for getting your garlic in the ground about 4 to 6 weeks before your first frost date. This will give the garlic enough time to establish its roots and possibly sprout before winter arrives.
Garlic likes to grow in soil that is rich and fertile. You also need to make sure that the soil is well-draining. Amend the soil with plenty of compost prior to planting. This will help to improve drainage as well as give the cloves a boost of additional nutrients at the time of planting.
If you have really dense soil, consider growing garlic in raised beds or bringing in new soil. If the soil is too dense and compacted, the garlic won’t be able to expand and grow into the large bulbs we’re after.
We had to really amend our soil because we started with extremely dense clay soil. After a few years of adding in compost and organic mulch and using cover crops, our soil is getting closer to the ideal composition you want for planting garlic.
Planting The Garlic
Garlic is made up of multiple cloves in each garlic bulb. Before planting, break apart the bulbs and choose the biggest and best cloves for planting. Save the smaller cloves for cooking because the bigger the garlic clove that you plant in the fall, the bigger the bulb will be in the summer!
Side note: Besides cost savings, there is another great advantage of growing and planting your own garlic. Each year, the garlic will start to become adjusted to your growing conditions and should only get better and better.
The easiest way I have found to plant garlic is to create one long row or trench using a spade or hoe. You want the trench to be a few inches deep and about two inches wide. If you didn’t already amend the soil, add compost at this time.
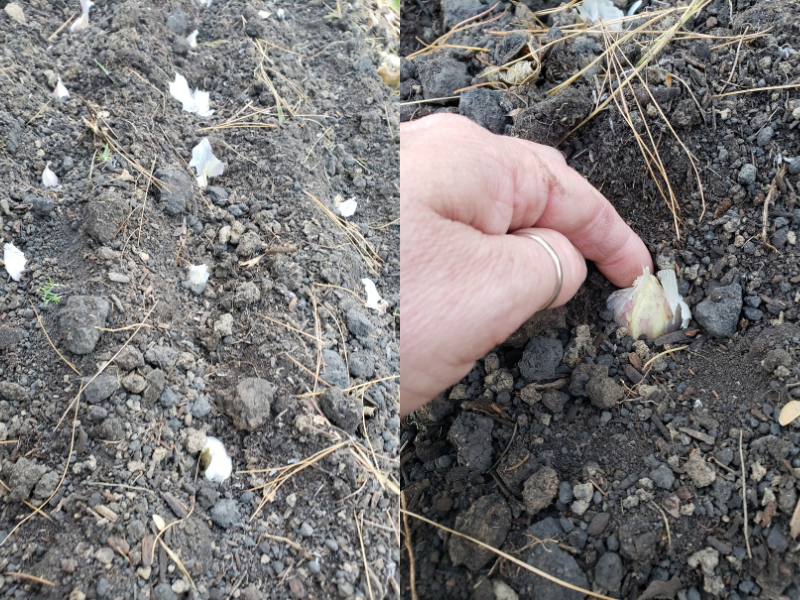
Place the garlic clove into the trench with the flat end down and the pointy end up. The flat bottom area is where the roots will grow from while the pointy end is where the sprout appears, so you want to have the correct end facing up. The top of the cloves should be about one inch below the soil’s surface.
Space each clove about four inches away from one another. When you go to do your next row, stagger the planting to fit the cloves in between the last row to help save you space. In my 24-inch wide growing row, I can comfortably get in three rows of garlic and could probably get away with four if I wanted.
Mulch The Soil
Once planted, cover the cloves with soil, add about an inch of mulch, and water well. You don’t want the mulch too thick at this point in case the garlic starts to sprout.

Use an organic mulch such as straw or grass clippings that will break down and add organic matter to your soil over time. I have even used shredded leaves before since they are in abundance in our yard during the fall season. Just be sure not to use whole leaves since this can create a mat that the garlic cannot sprout up through.
Late Fall And Winter Maintenance – Planting Garlic In The Fall
Until the garlic germinates, aim for watering once every couple of days. After germination, the garlic will need about an inch of rainfall or hand watering per week.
When the ground starts to freeze, stop watering and cover the garlic with a nice thick layer of mulch. This will help to protect it from the cold temps as well as the freezing and thawing of the ground that often comes with winter.
The garlic will go dormant over the winter and nothing more needs to be done. Most often, garlic will be one of the first crops to sprout in the spring and greet you along with the warmer spring temperatures! And there’s nothing like new signs of life after a long winter break!
Until next time, thanks for stopping by!
– Chelsea