One of the easiest and earliest vegetables to plant and grow is potatoes, but unlike most garden crops, they grow from seed potatoes as opposed to actual tiny seeds.
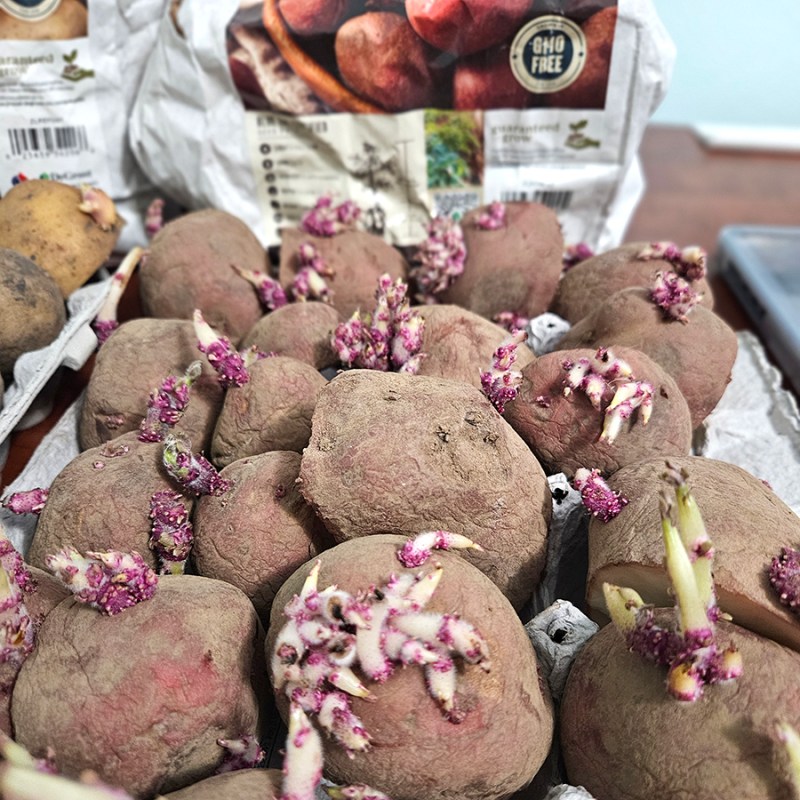
Have you ever forgotten about a bag of store-bought potatoes in your pantry or cabinet? By the time you find them, they likely have these little spikes growing out from all sides of them.
Those sprouts are coming out of what’s often referred to as the “eyes” of the potatoes (also known as buds). It’s from these eyes that new potato plants grow. Unlike tomatoes or peppers that grow from tiny seeds, potatoes use these sprouts to grow and produce roots and new potatoes.
So does that mean you can just go to your local grocery store (or your forgotten bag in the pantry) and grab a potato or two to stick in the soil? Maybe, but most likely the plant will struggle to grow and flourish. This is because most grocery store potatoes are sprayed with growth inhibitors that help to prevent sprouting and stunt the growth of the plants.
Instead, you need to use certified seed potatoes. These potatoes are certified disease-resistant and are grown for the sole purpose of producing new potato plants. You can usually purchase them at more farm stores, local garden centers, and at many reputable online retailers. Once you have your seed potatoes, the planting part is fairly simple, especially when you use grow bags!
How To Plant And Grow Seed Potatoes in Grow Bags
When To Plant
If you’ve ever googled when the best time to plant potatoes is, you’ve likely come across a few different old wives’ tales as well as more practical recommendations.
The “official” recommendation is that you can plant seed potatoes as soon as the ground can be worked in early spring. Once the soil temperature reaches 45º Fahrenheit (F) or warmer, the seed potatoes are good to go. At this temp, the potatoes have the best luck of quickly growing sprouts and roots and becoming established.

I, however, don’t follow those recommendations exactly. (What can I say, I’m a gardening rebel!). I actually prefer to follow one of those old wives’ tales and plant my seed potatoes on Good Friday if at all possible.
Why? Well, it’s what past generations of my family did, and I like to keep that tradition going. It’s worked for me so far, so I will continue to make Good Friday my planting date. Am I recommending that you go this route, well that’s totally up to you!
Another old wives’ tale pertains to planting according to the moon signs. Some state that you should plant root crops when the moon is waning. For crops that grow above the ground, you should plant them when the moon is waxing. This is not a method I have personally tried.
So yes, you are probably better off going by your growing zone and your soil temperature than you are one of these methods. But it is fun to experiment and see what works for you. Chalk this up as one of those cases of “do as I say not as I do” if you’d prefer!
Using Grow Bags
You can grow potatoes in traditional in-ground gardens, raised beds, or even containers. In fact, I prefer to use grow bags designed for planting and growing potatoes. You can also use grow bags for other crops like garlic, tomatoes, peppers, or pretty much any vegetable in your garden.
The reason why I like to use grow bags for my potatoes is that I have a lot more control over the soil than I do with in-ground growing. We have very heavy, dense clay soil that I have been working to amend year after year. Although it is better, it still isn’t ideal for growing potatoes since they require very loose, well-draining soil.
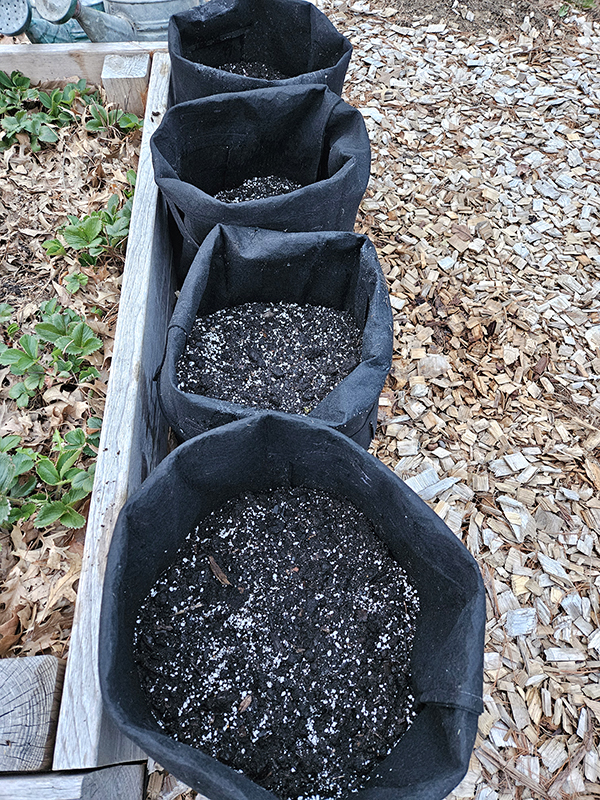
When using grow bags, just ensure that they are at least 10 gallons in size or larger. The bigger the bag, the more potatoes you can plant and grow. However, the bigger the bag, the more soil you need to purchase and the heavier the bags are. So that’s just something to keep in mind.
Since potatoes are root crops, they need plenty of space to grow and height for you to “mound” the soil. I’ve had mine for going on four years now and only had one handle rip, so I call that a good cheap investment. The exact grow bags I have are no longer available, but these are essentially the same – Product Link: 10-Gallon Grow Bags)
Chitting And Cutting
One of the best ways to prepare your seed potatoes for planting is to “chit” your potatoes. Chitting is a fun-to-say word that simply means that you are allowing the seed potatoes to sprout before planting.
A week or two before you hope to plant, place the seed potatoes in an area where they are exposed to light. Keep them in temperatures around 70º F. This will help to prompt the potatoes to sprout.

Either at the same time or a few days before planting, cut the larger seed potatoes into smaller pieces. The pieces should all be around golf ball or chicken egg sized and should have at least 2 to 3 eyes per piece. Keep any potato that is smaller than two inches whole.
Cutting the potatoes a few days before planting helps the fresh cuts develop a callous to prevent rotting. Place the chitting potatoes on an empty egg carton to help increase airflow during this process.
If not all of the eyes sprout, it isn’t the end of the world. The chitting process just helps to speed up sprouting and might allow you to harvest potatoes a bit sooner than those that haven’t sprouted yet. Potatoes typically take around 60 to 90 days from planting until harvesting.
Planting Seed Potatoes
Fill up your grow bags with about six inches of soil. I use a combination of potting soil, perlite, and compost to create loose soil that is packed full of nutrients.
Into the grow bags, place 3 to 4 seed potatoes evenly spaced out. If you have larger grow bags, you can plant more potatoes. I’ve found that in the bags I use, I can get 3 plants to grow comfortably.

Place the seed potatoes into the soil with the majority of the sprouts facing upwards. Try not to break off or damage any of the sprouts. Cover lightly with soil and water them deeply. I like to top my grow bags off with a couple of inches of grass clippings for mulch to help the soil retain moisture a bit better. The potatoes will easily grow up through the grass clippings.
Place the bags in a location that receives at least 6 to 8 hours of full sunlight each day. If your grow bags are taller like mine are, fold the sides down so that the plant can get plenty of sunlight. Then just unfold the sides as the plants grow.
Maintaining Growing Potatoes
Seed potatoes need plenty of water during the growing period and while flowering. Water the plants deeply at least twice a week, but check the soil first to avoid overwatering. Plants grown in the ground can get by with less watering but the soil in grow bags tends to dry out quicker. Stop watering once the foliage starts to die off.
As the plants start to grow, add more soil and mulch to the grow bags. Just pile the soil onto the green growth, leaving just the top inch or two exposed. This process is called “mounding” or hilling. It helps to protect the growing tubers as well as encourage additional growth.

This is part of the reason why I like using the grow bags with tall sides because I can simply unfold the tops as I add more soil and the plants grow bigger.
The foliage will start to quickly fill out. New or baby potatoes can be harvested about 2 to 3 weeks after the plants have finished flowering. If you want full-sized mature spuds that you can store, wait to harvest until about 2 to 3 weeks after the foliage dies back.
Hopefully, you will give planting and growing seed potatoes using grow bags a try this year!
Until next time, thanks for stopping by!
– Chelsea