You are almost to the finish line: You’ve made it to Part 3 of my Starting Seeds Indoors Series! This post is all about hardening off your indoor plants to prepare them for planting.
What exactly does hardening off mean in terms of gardening? Basically, it is the process of getting your seedlings ready for the elements of mother nature.
Wind, rain, fluctuating temperatures, even the sun and shade can all wreak havoc on plants. This is especially true for young seedlings that haven’t been properly exposed to those types of elements before.

I mean, just picture your seed starting setup. Chances are they are on some type of shelf or table. The worst they really have to worry about is the indoor cat jumping up and taking a nibble (or maybe that is just my house)!
While hardening plants won’t prepare them for hungry stray animals, it will help to get them ready for all the other elements that can come with being outdoors.
Part 3 of Starting Seeds Indoors: Hardening Off Plants
There are a few different ways to harden off plants, but this is the process that has worked for me and my plants. You need to keep in mind that this process will vary slightly depending on your location and the climate you live in. I am in Illinois Zone 5b, so we have very (VERY) up and down temperatures in the spring.
For example, just last week I was wearing shorts and sweating in 80º F temperatures while working outside. The very next day, we had snow on the ground and a freeze warning happening that night. That’s the good ol’ Midwest for you, but it does keep you on your toes this time of year!
So, please keep that in mind when going through these tips and suggestions. Even if you live in the South, you will need to harden off any plants that you have started indoors. Your purchased plants can also benefit from hardening off since most nurseries have somewhat regulated temperatures and atmospheres as well.
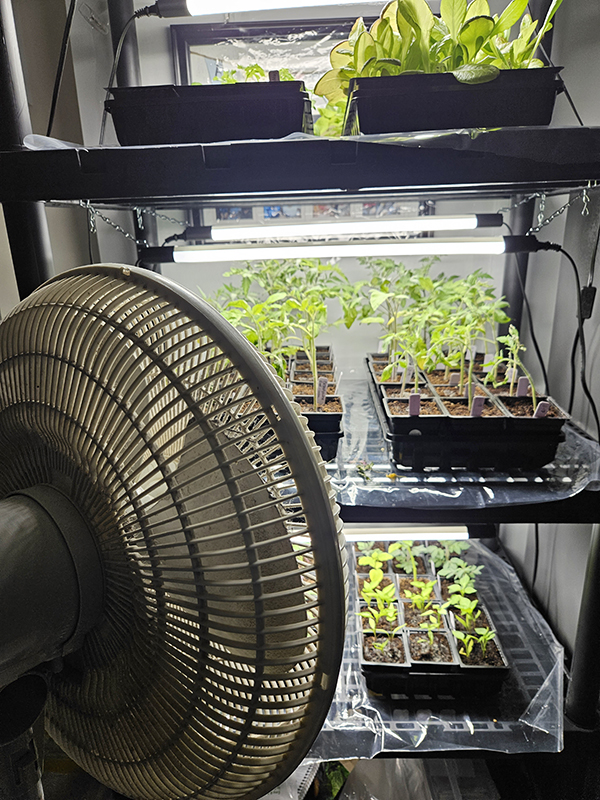
Artificial Wind
The first way to help plants harden off can happen any time after seeds have germinated and long before you are thinking about bringing them outside. And that is using a fan.
It’s a good idea to set up a fan near your seed starting station. Just your typical floor or stand fan you would use to help cool off in the hot summer months works just fine.
Once a day for a few hours, turn the fan on medium and allow it to osculate if possible. Try to move plants around occasionally so that all sides as well as all of your growing trays get a chance to get lightly tossed about by the fan.
This use of the fan will help to replicate the wind blowing outside . . . somewhat. Yes, the plants will lean some. But they will also start to grow thicker stems to help stabilize themselves against the wind. This will lead to stronger plant bases as well as help give plants a head start on the next part of the hardening-off process.
Day Trips Outside – Starting Seeds Indoors Part 3
Once your daytime temperatures reach around the upper 50s to 60º F, it’s ok to let your plants take some day trips outside.

What I mean by that is to start to move your plant trays outside during the warmer daylight hours. Place the seedlings in a location where they can receive indirect sun, but where they are protected by strong winds or other elements. A front porch or under a house awning is a great spot.
Allow the seeds to hang out outside during the day. Be sure to bring the plants inside at this point if it starts to rain heavily, if the wind picks up, or if the temperatures start to fluctuate too much. Keep an eye on the appearance of your plants and be on the lookout for signs of stress or issues.
You can start to do this process about three weeks or so before you plan on planting as long as the temperatures allow. Slowly start to move the plants to sunnier locations and spots that might receive a bit more wind. Increase the time the plants are in these locations daily or as your schedule allows.
Maybe instead of on your front porch, move them to your sunny back deck that is still out of the wind. Then you start to move them to the location where you plan to transplant them. Slow and gradual is the key here so you don’t end up stressing the plants out too much.
All Nighters – Starting Seeds Indoors Part 3
After about a week and as long as temperatures allow, you can start to give the plants all-nighters (i.e., keep plants outside 24/7).

Still keep them in slightly protected locations around your property for at least the first few days, especially at night. You also still want to bring them back inside in cases of severe weather or strong winds.
Continue to water plants and fertilize them as you would if they were indoors. Your watering schedule might vary slightly from what you had indoors in the controlled environment. This is especially true if you have warmer temperatures than what your house was kept at.
Before you know it though, those plants will be strong and ready to tackle whatever mother nature has to throw at them. Well, mostly! You will at least be setting the seedlings up for success and less stressed by hardening them off prior to planting them out in your garden or raised beds.
It’s Time To Transplant!
And that’s it! That’s the end of my Starting Seeds Indoors Series! I hope you were able to learn a few tips and tricks that you can use to get your own seeds started.
If you are hesitant, just give it a try! Purchase one or two LED lights and start small. I guarantee that you will have some losses as well as some wins in the process (I sure have!). But don’t give up! A lot of gardening is trial and error. Some years you will have great success and the next you will crash and burn (well, maybe not that dramatic but you get the idea).

If you have any questions or tips that you’d like to add, I’d love to hear them! I’d also love to hear if this series helped you at all and if you’d like me to do more series like this one.
If you happened to stop by this post first, be sure to also check out Part 1 and Part 2 of my Starting Seeds Indoors Series. I think you might surprise yourself if you give it a try and find a new obsession with starting seeds! You can do it!
Until next time, thanks for stopping by!
– Chelsea
*This post may contain affiliate links. These are products I have used personally and highly recommend. As an Amazon Associate, I may earn a small commission from qualifying purchases if you purchase items through my links. These links and the ads on this page help to support my family and our semi homestead, so Thank You!

Hello! I'm Chelsea, the writer & photographer behind Semi Homestead Life. As a wife and mom of two busy teen kids, I attempt to incorporate basic homesteading practices while staying practical to today's crazy life (and trying to be honest about the whole process)! I love writing, gardening, photography, crafting, cooking, and so much more!
Discover more from Semi Homestead Life
Subscribe to get the latest posts sent to your email.